前言
在前端切图过程中遇到一个制作聊天对话框中的箭头效果,如下图。

在我还是一个CSS小白的时候,我都是用一个图片来制作这个冒泡效果的,显得很low,很没气质。
教程效果演示
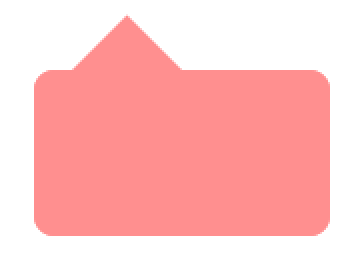
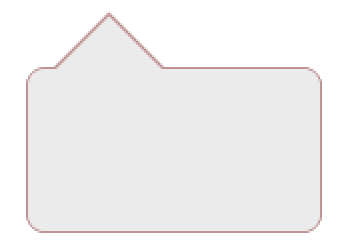
以上2种效果是我们常见的样式。
原理图
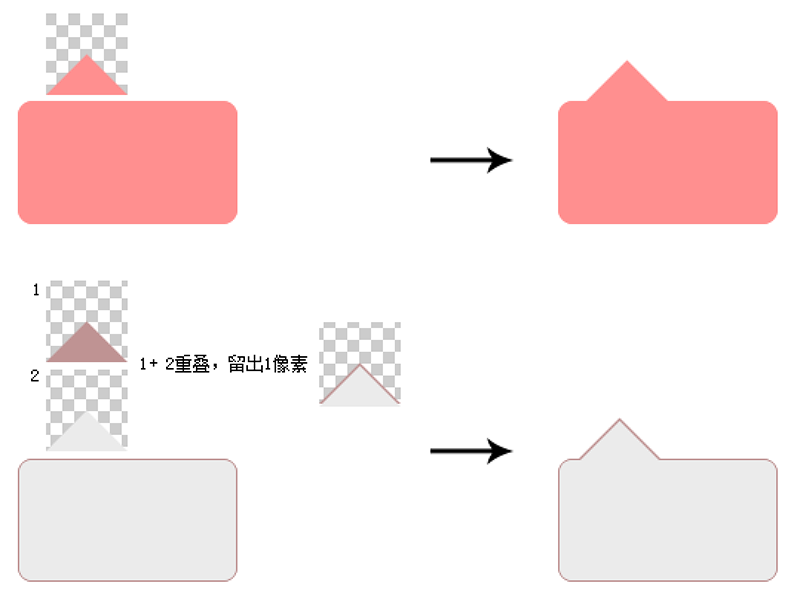
样式一:
这种比较简单,说一下步骤:
1、我们写一个div,写出尺寸和圆角,并且设置position属性。
2、用伪类::before来定义一个长宽都是0的形状,然后通过border属性,三边设置透明,底边设置颜色。
3、通过将::before定位到div上方合适的位置,组合而成。
样式二:
这种操作步骤跟样式一基本一样,多一个小细节:
1、写一个div,写出员村、边框线、圆角,并且设置position属性。
2、用伪类::before来定义一个长宽都是0的形状,然后通过border属性,三边设置透明,底边设置div的背景色。
3、用伪类::after来定义一个长宽都是0的形状,然后通过border属性,三边设置透明,底边设置div的边框色。
4、通过将::before、:after定位到div上方合适的位置,组合而成。
5、注意::before、:after定位的层级,背景色元素在上,边框色元素在下,即用背景色元素遮挡住边框色元素。
6、注意背景色元素要比边框色元素低1~2像素,目的是让背景色元素露出一点点,正好就像边框线一样。
实现代码
<!DOCTYPE html>
<html lang="en">
<head>
    <meta charset="UTF-8">
    <meta name="viewport" content="width=device-width, initial-scale=1.0">
    <title>CSS制作留言聊天框中的冒泡尖角效果 纯色+边框技巧教程</title>
    <style>
        .demo{ padding:50px; }
        .mb10{ margin-bottom: 10px;}
        hr{ margin:20px 0;}
        .msg1{ position: relative; width:300px;background: #d0d0d0; border-radius: 10px; padding:20px; margin-top:50px; }
        .msg1::before{ position: absolute; left:30px; top:-20px; content:''; width:0; height: 0; border:10px solid transparent; border-bottom-color:#d0d0d0; }
        .msg2{ position: relative; width:300px;background: #f2f2f2; border:1px solid #d0d0d0; border-radius: 10px; padding:20px; margin-top:50px; }
        .msg2::before,.msg2::after{ position: absolute; content:''; width:0; height: 0; border:10px solid transparent;  }
        .msg2::before{ left:30px; top:-20px; border-bottom-color:#d0d0d0; }
        .msg2::after{ left:30px; top:-19px; border-bottom-color:#f2f2f2; }
    </style>
</head>
<body>
    <div class="demo">
        <div class="mb10">效果1</div>
        <div class="msg1">Hello World!</div>
        <hr>
        <div class="mb10">效果2</div>
        <div class="msg2">Hello China!</div>
    </div>
</body>
</html>
你学会了嘛?学会这个技巧,你可以依葫芦画瓢作出其他位置、其他形状的聊天气泡效果啦。
联系客服
请使用QQ扫码

请使用微信扫码
回复时间:工作日下午4点30以后;周六周日不限。
您的真诚赞赏,是我前进的动力!
- 分享:
- 文章标题:CSS制作留言聊天框中的冒泡尖角效果 纯色+边框技巧教程
- 文章标签: css聊天气泡效果 CSS气泡 CSS教程 更多
- 版权声明:本文为
 CMS博客 原创,未经授权禁止转载、摘编、复制或建立镜像。





文章评论(审核通过可见)